- 1. Step-by-Step: Install Docker & Enable at Boot
- 2. Install docker compose
- 3. Download and modify passbolt docker compose file
- 4. check your final directory structure
- 5. Start your containers
- 6. Create first admin user
- 7. Setup Nginx & map to your dns system
- 8. Allow Necessary Firewall Ports for Passbolt Access
1. Step-by-Step: Install Docker & Enable at Boot
For Ubuntu / Debian
# 1. Update system packages
sudo apt update && sudo apt upgrade -y

# 2. Install prerequisite packages
sudo apt install -y apt-transport-https ca-certificates curl software-properties-common gnupg

# 3. Add Docker’s official GPG key
curl -fsSL https://download.docker.com/linux/ubuntu/gpg | sudo gpg --dearmor -o /usr/share/keyrings/docker-archive-keyring.gpg

# 4. Set up the stable Docker repo
echo "deb [arch=$(dpkg --print-architecture) signed-by=/usr/share/keyrings/docker-archive-keyring.gpg] https://download.docker.com/linux/ubuntu $(lsb_release -cs) stable" \
| sudo tee /etc/apt/sources.list.d/docker.list > /dev/null

# 5. Install Docker Engine
sudo apt update
sudo apt install -y docker-ce docker-ce-cli containerd.io

# 6. Enable Docker service to start at boot
sudo systemctl enable docker

# 7. Start Docker now
sudo systemctl start docker

# 8. (Optional) Verify Docker version
docker --version
For CentOS / RHEL
# 1. Remove old versions if any
sudo yum remove -y docker docker-client docker-client-latest docker-common docker-latest docker-latest-logrotate docker-logrotate docker-engine

# 2. Install required packages
sudo yum install -y yum-utils

# 3. Add Docker repository
sudo yum-config-manager --add-repo https://download.docker.com/linux/centos/docker-ce.repo

# 4. Install Docker Engine
sudo yum install -y docker-ce docker-ce-cli containerd.io

# 5. Enable Docker to start on boot
sudo systemctl enable docker

# 6. Start Docker
sudo systemctl start docker

# 7. (Optional) Check Docker version
docker --version
Post-Install Checks
# status check
sudo systemctl status docker

# optional to test complete the docker
sudo docker run hello-world
2. Install docker compose
sudo curl -L "https://github.com/docker/compose/releases/download/1.29.2/docker-compose-$(uname -s)-$(uname -m)" -o /usr/local/bin/docker-compose
sudo chmod +x /usr/local/bin/docker-compose
docker-compose --version
[output]
Outputdocker-compose version 1.29.2, build 5becea4c
3. Download and modify passbolt docker compose file
step 1 : Download docker compose from official link
# create directory:
mkdir passbolt-docker-workspace
cd assbolt-docker-workspace

# execute below command:
curl -LO https://download.passbolt.com/ce/docker/docker-compose-ce.yaml
curl -LO https://github.com/passbolt/passbolt_docker/releases/latest/download/docker-compose-ce-SHA512SUM.txt
Step 2. Ensure the file has not been corrupted by verifying its shasum
sha512sum -c docker-compose-ce-SHA512SUM.txt

[must return following output]
docker-compose-ce.yaml: OK
Step 3. Configure environment variables in the docker-compose yaml file to customize your instance.
services:
  db:
    image: mariadb:10.11
    restart: unless-stopped
    environment:
      MYSQL_RANDOM_ROOT_PASSWORD: "true"
      MYSQL_DATABASE: "passbolt"
      MYSQL_USER: "passbolt"
      MYSQL_PASSWORD: "P4ssb0lt"
    volumes:
      - database_volume:/var/lib/mysql

  passbolt:
    image: passbolt/passbolt:latest-ce
    #Alternatively you can use rootless:
    #image: passbolt/passbolt:latest-ce-non-root
    restart: unless-stopped
    depends_on:
      - db
    environment:
      APP_FULL_BASE_URL: https://pass.abhiramdas.site
      DATASOURCES_DEFAULT_HOST: "db"
      DATASOURCES_DEFAULT_USERNAME: "passbolt"
      DATASOURCES_DEFAULT_PASSWORD: "P4ssb0lt"
      DATASOURCES_DEFAULT_DATABASE: "passbolt"
      EMAIL_DEFAULT_FROM_NAME: "Passbolt Admin"
      EMAIL_DEFAULT_FROM: "admin@abhiramdas.site"
      EMAIL_TRANSPORT_DEFAULT_HOST: "mail.abhiramdas.site"
      EMAIL_TRANSPORT_DEFAULT_PORT: "587"
      EMAIL_TRANSPORT_DEFAULT_USERNAME: "admin@abhiramdas.site"
      EMAIL_TRANSPORT_DEFAULT_PASSWORD: "[yourpassword]"
      EMAIL_TRANSPORT_DEFAULT_TLS: "true"

    volumes:
      - gpg_volume:/etc/passbolt/gpg
      - jwt_volume:/etc/passbolt/jwt
    command:
      [
        "/usr/bin/wait-for.sh",
        "-t",
        "0",
        "db:3306",
        "--",
        "/docker-entrypoint.sh",
      ]
    ports:
      - 8081:80  # allways keep free docker host port 80 for nginx or reverproxy
      - 4431:443 # allways keep free docker host port 443for nginx or reverproxy
    #Alternatively for non-root images:
     # - 80:8080
     # - 443:4433

volumes:
  database_volume:
  gpg_volume:
  jwt_volume:
4. check your final directory structure

5. Start your containers
docker-compose -f docker-compose-ce.yaml up -d6. Create first admin user
docker-compose -f docker-compose-ce.yaml \
exec passbolt su -m -c "/usr/share/php/passbolt/bin/cake \
  passbolt register_user \
    -u abhiram@abhiramdas.site \
    -f abhiram \
    -l das \
    -r admin" -s /bin/sh www-data


# explaination above parameter :
# - u = email of the users which you want to registered within admin role
# - f = first name
# - l = last name
# - r = admin role, please dont delete it

[output]
It will output a link similar to the below one that can be pasted on the browser to finalize user registration:
https://abhiramdas.site/setup/install/1eafab88-a17d-4ad8-97af-77a97f5ff552/f097be64-3703-41e2-8ea2-d59cbe1c15bc

you need to copy the link to your url to registered this user
7. Setup Nginx & map to your dns system
7.1. Installation
# update your package index
sudo apt update -y

# Install nginx
sudo apt install nginx -y

# allow nginx throught the firewall(ufw)
sudo ufw allow 'Nginx Full'

# enable and start nginx
sudo systemctl enable nginx
sudo systemctl start nginx

# Check Nginx Status
sudo systemctl status nginx
7.2. configuration
#create file as below :
nano /etc/nginx/sites-available/pass.abhiramdas.site
# write the below script on that file & save that
server {
    listen 80;
    server_name pass.abhiramdas.site;

    location / {
        proxy_pass http://localhost:8081;
        proxy_set_header Host $host;
        proxy_set_header X-Real-IP $remote_addr;
        proxy_set_header X-Forwarded-For $proxy_add_x_forwarded_for;
        proxy_set_header X-Forwarded-Proto $scheme;
    }
}

# create a soft link in site-enabled
sudo ln -s /etc/nginx/sites-available/pass.abhiramdas.site /etc/nginx/sites-enabled/

# Test nginx config for errors
sudo nginx -t

# Reload nginx
sudo systemctl reload nginx
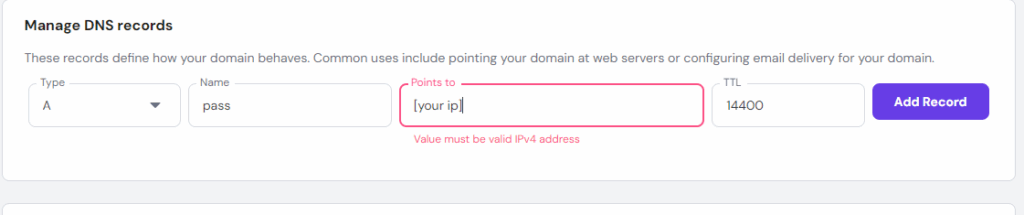
7.3. Add an A record in your dns
7.4. Install Certbot and Issue SSL Certificate to your subdomain
# install certbot:
sudo apt update
sudo apt install certbot python3-certbot-nginx -y

# iisue the certificate
sudo certbot --nginx -d pass.abhiramdas.site

# enable auto-renew . make sure you are doing it from root user
sudo crontab -e

# add the following line
0 3 * * * certbot renew --quiet --post-hook "systemctl reload nginx"

# final testing
sudo nginx -t
sudo systemctl reload nginx
8. Allow Necessary Firewall Ports for Passbolt Access
There may be multiple layers of protection in your setup (e.g., UFW, cloud provider security groups, hosting panel firewalls). Ensure the following ports are open in both inbound and outbound rules at all levels:
- SSH Port (default 22 or custom) – For secure remote access (consider changing from default for better security).
- Port 80 (HTTP) – For initial setup or non-HTTPS access.
- Port 443 (HTTPS) – Required for secure Passbolt web access.
- Mail Ports (e.g., 25, 465, 587) – If Passbolt needs to send notification or alert emails.
🔐 Now is a critical time as AI-driven bot attacks and mass-scale DDoS attacks are increasing. I strongly recommend enabling advanced security measures like rate limiting, firewall hardening, and intrusion detection systems to protect your infrastructure.
💡 Tip: Changing the default SSH port and using key-based authentication helps prevent common brute-force attacks.
Here are the UFW (Uncomplicated Firewall) commands to allow all the mentioned ports for Passbolt and secure server operation:
# Allow SSH (replace 22 with your custom port if changed)
sudo ufw allow 22/tcp
# Allow HTTP
sudo ufw allow 80/tcp
# Allow HTTPS
sudo ufw allow 443/tcp
# Allow mail ports
sudo ufw allow 25/tcp
sudo ufw allow 465/tcp
sudo ufw allow 587/tcp
# Enable UFW if not already enabled
sudo ufw enable
# Reload UFW to apply all changes
sudo ufw reload
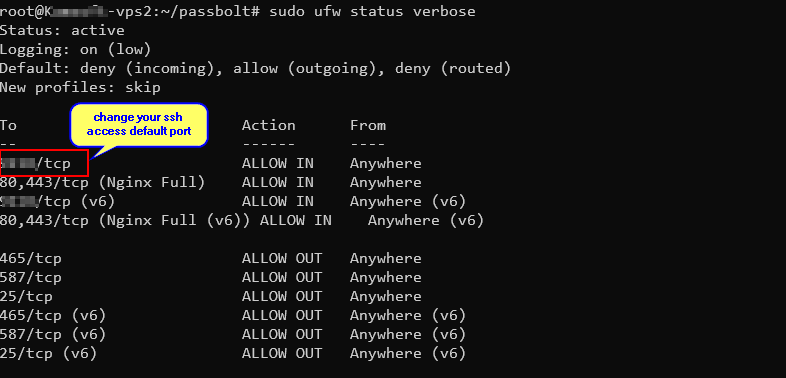
# Show the status with verbose output
sudo ufw status verbose
Optional (Advanced Security Suggestion):
If you have changed your SSH port (e.g., to 2222), use this instead:
sudo ufw allow 2272/tcpYou can follow this link for more detail – https://www.linkedin.com/pulse/your-vpscloud-instance-safe-from-ddos-flood-attacks-bot-abhiram-das-9y8nf/